GitHub Repo
https://github.com/zaskier/OnlineShop
Content managment website for Shop Allows to Manage Content of Page , for administrator through databases and user to boy them write to database info about every transaction //Made from Empty WebSite //ASP.Net(MVC, NET Framework 4.5, ADO.NET, Entity Framework, LINQ, C#, CSS, HTML) SQL(MS SQL Server Managment Studio) 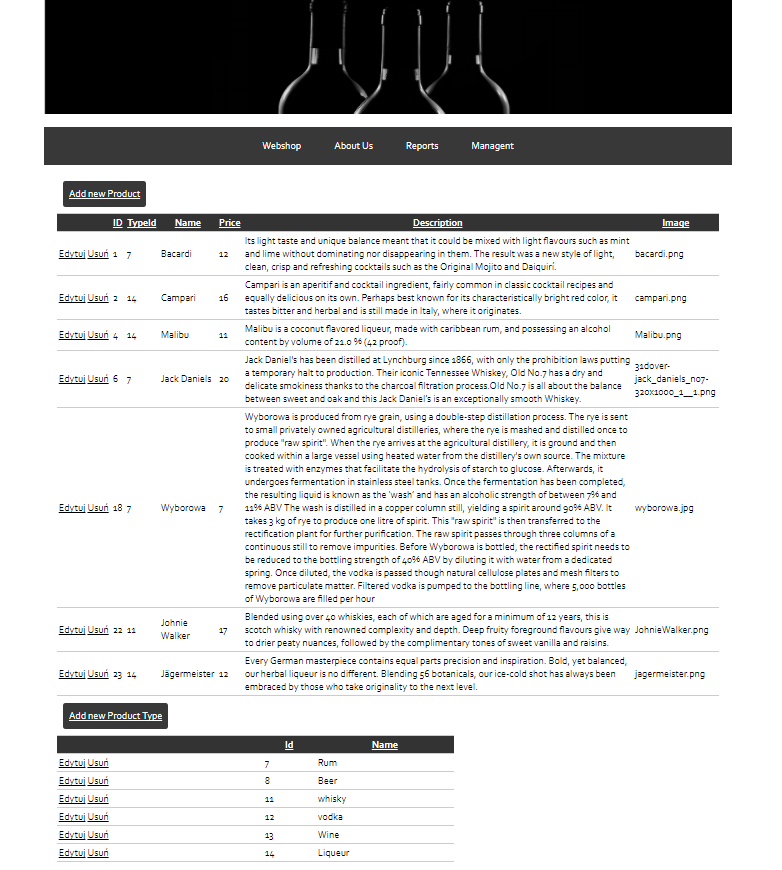 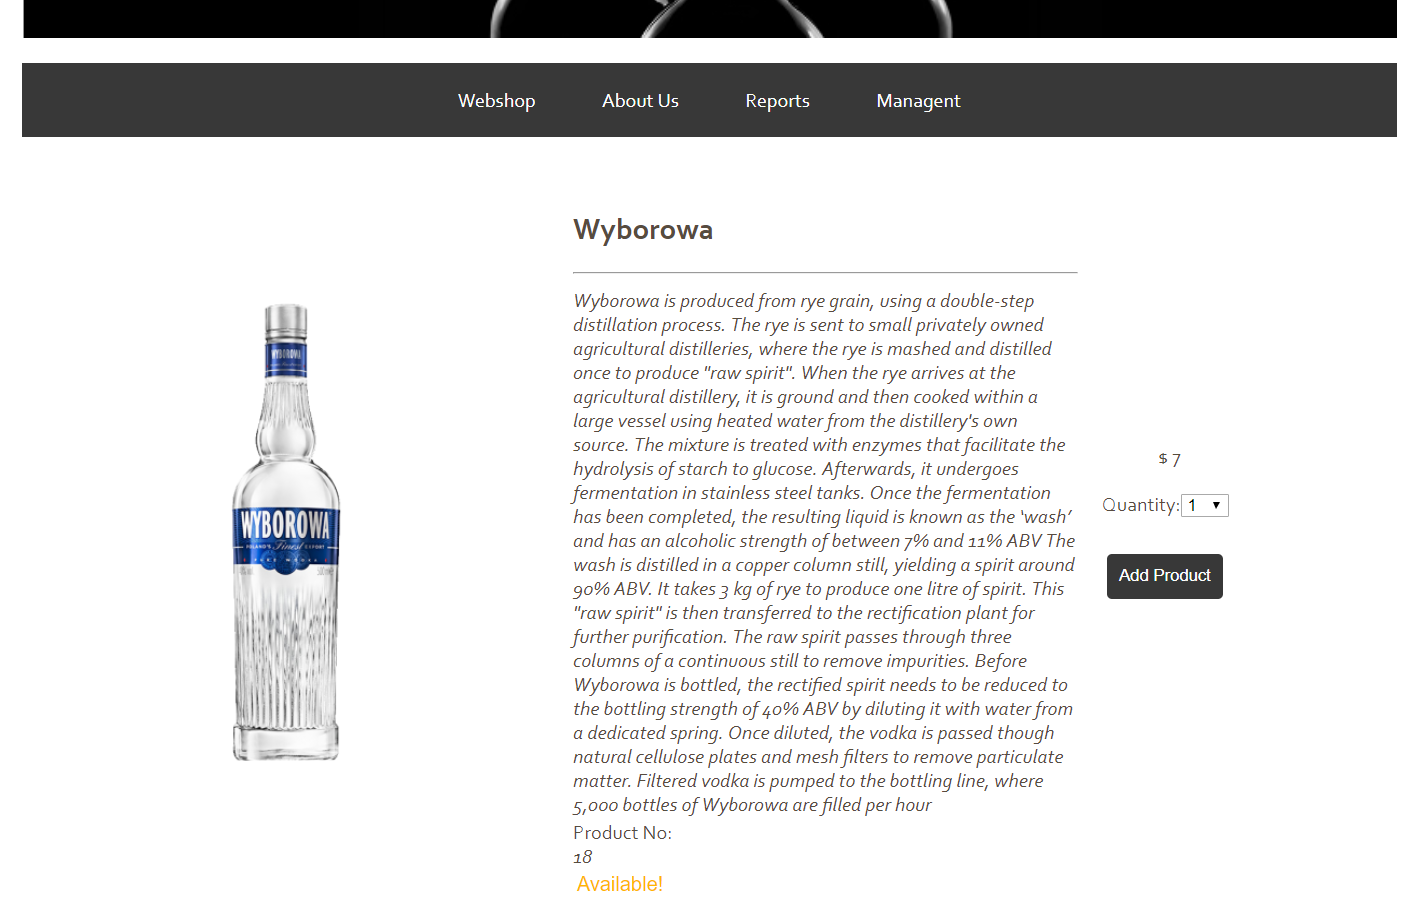 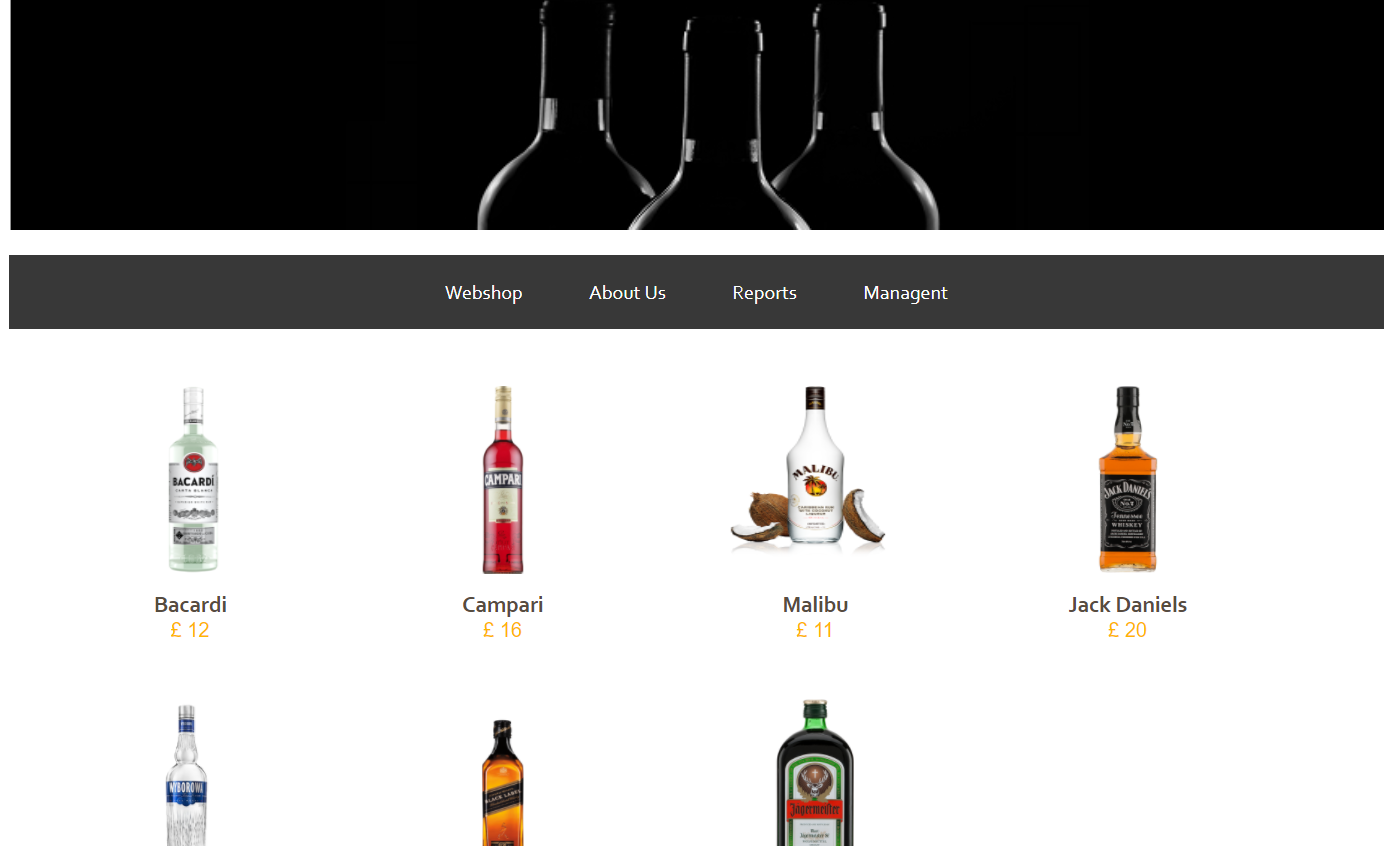 i will Create website for this project soon
GitHub Repo
https://github.com/bisamnihad-sketch/EtsyDigitalStudioPL
Reverse-engineer best-selling designs and upgrade them for Etsy Digital Products (PNG for POD).
GitHub Repo
https://github.com/alwismt/ABC-Car-Traders
The developed system is motor vehicle management system for ABC car Traders. From this system they can handle daily activity of registered customers, sell their cars and services. Admins has permission of overall system. Only admins can Manage Users, Cars, Parts, Services and add other admins. Also, system has customers, customers can purchase service or products like as car and car parts. To develop this system, I has used Visual Studio 2019 / C# programming language to design interfaces and SQL Server 2019 for create database. In addition, to make modern appearance of interfaces, I has used HTML color codes, PNG icons styles and etc.
GitHub Repo
https://github.com/aidevme/microsoft-cloud-product-icons
Microsoft Cloud & Power Platform product icons for developers. SVG/PNG icons for Azure, Microsoft 365, Power Platform, Dynamics 365 and Copilot Studio. Perfect for architecture diagrams, documentation and presentations.
GitHub Repo
https://github.com/Tanjiro8287/unamea-hack
---78665 title: Quickstart for Codespaces intro: 'Try out {% data variables.product.prodname_codespaces %} in 5 minutes.' allowTitleToDifferFromFilename: true product: '{% data reusables.gated-features.codespaces %}' versions: fpt: '*' ghec: '*' type: quick_start topics: - Codespaces redirect_from: - /codespaces/codespaces-quickstart --- ## Introduction In this guide, you'll create a codespace from a [template repository](https://github.com/2percentsilk/haikus-for-codespaces) and explore some of the essential features available to you within the codespace. From this quickstart, you will learn how to create a codespace, connect to a forwarded port to view your running application, use version control in a codespace, and personalize your setup with extensions. For more information on exactly how {% data variables.product.prodname_codespaces %} works, see the companion guide "[Deep dive into {% data variables.product.prodname_codespaces %}](/codespaces/getting-started/deep-dive)." ## Creating your codespace 1. Navigate to the [template repository](https://github.com/2percentsilk/haikus-for-codespaces) and select **Use this template**. 2. Name your repository, select your preferred privacy setting, and click **Create repository from template**. 3. Navigate to the main page of the newly created repository. Under the repository name, use the **{% octicon "code" aria-label="The code icon" %} Code** drop-down menu, and in the **Codespaces** tab, click **Create codespace on main**.  ## Running the application Once your codespace is created, your repository will be automatically cloned into it. Now you can run the application and launch it in a browser. 1. Since this example uses a Node.js project, start the application by entering `npm run dev` in the terminal. This command executes the `dev` script in the package.json file and starts up the web application defined in the sample repository.  If you're following along with a different application type, enter the corresponding start command for that project. 2. When your application starts, the codespace recognizes the port the application is running on and displays a prompt to let you know it has been forwarded.  3. Click **Open in Browser** to view your running application in a new tab. ## Edit the application and view changes 1. Switch back to your codespace and open the `haikus.json` file by double-clicking it in the File Explorer. 2. Edit the `text` field of the first haiku to personalize the application with your own haiku. 3. Go back to the running application tab in your browser and refresh to see your changes. {% octicon "light-bulb" aria-label="The lightbulb icon" %} If you've closed the tab, open the Ports panel and click the **Open in browser** icon for the running port.  ## Committing and pushing your changes Now that you've made a few changes, you can use the integrated terminal or the source view to commit and push the changes back to the remote. {% data reusables.codespaces.source-control-display-dark %} 1. To stage your changes, click **+** next to the file you've changed, or next to **Changes** if you've changed multiple files and you want to stage them all.  1. Type a commit message describing the change you've made.  1. To commit your staged changes, click the check mark at the top the source control side bar.  You can push the changes you've made. This applies those changes to the upstream branch on the remote repository. You might want to do this if you're not yet ready to create a pull request, or if you prefer to create a pull request on {% data variables.product.prodname_dotcom %}. 1. At the top of the side bar, click the ellipsis (**...**).  1. In the drop-down menu, click **Push**. ## Personalizing with an extension Within a codespace, you have access to the Visual Studio Code Marketplace. For this example, you'll install an extension that alters the theme, but you can install any extension that is useful for your workflow. 1. In the left sidebar, click the Extensions icon. 2. In the search bar, enter `fairyfloss` and install the fairyfloss extension.  3. Select the `fairyfloss` theme by selecting it from the list.  4. Changes you make to your editor setup in the current codespace, such as theme and keyboard bindings, are synced automatically via [Settings Sync](https://code.visualstudio.com/docs/editor/settings-sync) to any other codespaces you open and any instances of Visual Studio Code that are signed into your GitHub account. ## Next Steps You've successfully created, personalized, and run your first application within a codespace but there's so much more to explore! Here are some helpful resources for taking your next steps with {% data variables.product.prodname_codespaces %}. - [Deep dive](/codespaces/getting-started/deep-dive): This quickstart presented some of the features of {% data variables.product.prodname_codespaces %}. The deep dive looks at these areas from a technical standpoint. - [Setting up your project for {% data variables.product.prodname_codespaces %}](/codespaces/getting-started-with-codespaces): These guides provide information on setting up your project to use {% data variables.product.prodname_codespaces %} with specific languages. - [Configuring {% data variables.product.prodname_codespaces %} for your project](/codespaces/setting-up-your-codespace/configuring-codespaces-for-your-project): This guide provides details on creating a custom configuration for {% data variables.product.prodname_codespaces %} for your project. ## Further reading - [Enabling {% data variables.product.prodname_codespaces %} for your organization](/codespaces/managing-codespaces-for-your-organization/enabling-codespaces-for-your-organization) - [Managing billing for {% data variables.product.prodname_codespaces %} in your organization](/codespaces/managing-codespaces-for-your-organization/managing-billing-for-codespaces-in-your-organization)